Adding a chatbot to your website takes minutes once it's configured. Generate an embed code from your chatbot platform, paste it into your site’s header or body, and publish. This guide walks you through the process for any website, with platform-specific instructions for WordPress, Shopify, Squarespace, and Wix, using Chatling as an example.
For more guides and comparisons like this, visit the Chatling blog.
Looking to add a chatbot to your website?
Customer questions don't wait for business hours. Visitors land on your site at 11 PM with a sizing question, an order tracking issue, or a feature query. If they can't get an answer fast, they leave.
A chatbot solves the speed problem. The right one answers product questions, helps with orders, qualifies leads, and hands off to a human when needed. All without keeping someone on your team online around the clock.
This Chatling guide shows how to add a chatbot to any website, with step-by-step instructions for the most common platforms. By the end, you'll have a working chatbot live on your site, ready to engage visitors.
Why listen to us?
At Chatling, we help teams launch AI support agents that resolve real customer questions, not just deflect them. Our platform powers support for 1,000+ teams across SaaS, e-commerce, and service businesses, with a 4.7 rating on G2 and chatbots deployed across websites, WhatsApp, Messenger, and Instagram from one unified inbox. This guide draws on that experience to show you how to integrate chatbots across various website setups.

What is chatbot integration and how does it work?
Integrating a chatbot into your website is the process of embedding a chatbot into a website so it can interact with visitors in real time. The chatbot lives as a widget on your pages, usually in the bottom corner, and answers questions, guides visitors, captures leads, or routes tickets.
The technical side is simple. Most chatbot platforms generate an embed code, a short snippet of JavaScript, that you paste into your site's HTML. The code loads the chatbot widget on every page where it's placed.
For example, an e-commerce site might use a chatbot to help visitors find products, check order status, or recover abandoned carts. A SaaS site might use it to answer feature questions, route support tickets, or book demos. A service business might use it for FAQs and appointment scheduling.
The chatbot itself does the work. Integration is just the step that puts it in front of your visitors.
Benefits of integrating a chatbot into your website
Adding a chatbot to your website does more than make customer support faster. Other benefits include:
- Improved user engagement: Chatbots interact with visitors in real time, answer questions, guide them through your website, and provide personalized assistance when they need help. All of these help to improve the customer experience.
- Automated support: Chatbots handle repetitive queries like FAQs, order updates, and account issues, reducing the workload for support teams while keeping answers consistent.
- Faster response times: Chatbots respond instantly to customer inquiries, cutting down wait times and helping visitors get the information they need faster.
- Data collection and insights: Chatbots collect useful data from customer interactions, helping businesses understand preferences, behavior patterns, common questions, and gaps in website content.
- Enhanced sales and conversions: Chatbots support buyers by recommending products, recovering abandoned carts, answering purchase questions, and guiding users through checkout.
How to integrate a chatbot into your website in 5 steps
This is the general process to add a chatbot to any custom website, using Chatling as an example.
Step 1: Create Your AI chatbot
Sign in to your Chatling account and open the My Agents page, then click Create.
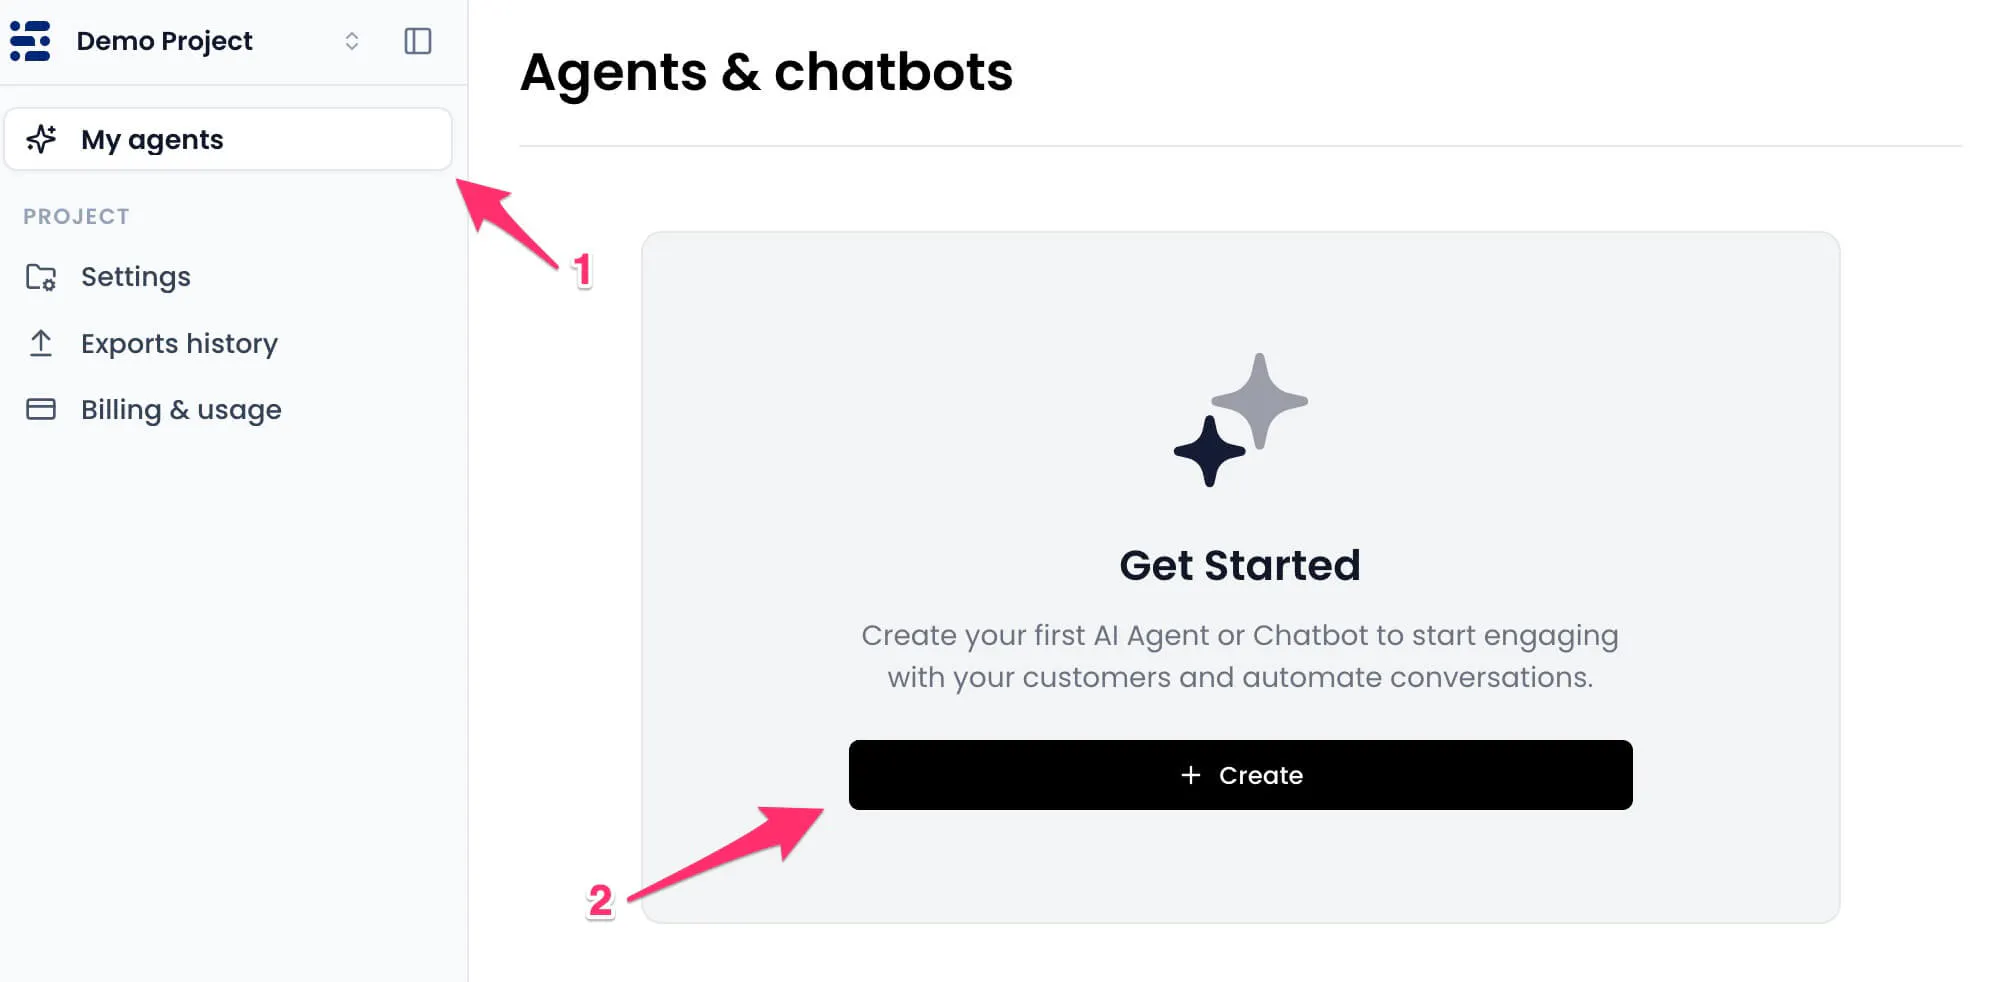
Choose AI Agent as the type, give it a name (e.g. "Support Assistant"), and click Create Agent.
Unlike a traditional rule-based chatbot, an AI agent understands user intent and plans its own responses dynamically, so you're not stuck mapping out every possible question in a workflow.
Step 2: Populate the knowledge base
An AI chatbot is only as smart as the information it has access to. Add data sources so it can answer questions accurately about your business.
Go to Knowledge base > Add Data Source and upload any mix of:
- Your website URLs
- Documents and PDFs (policies, product manuals, guides)
- Text and FAQs
- Articles via Zendesk, Zoho, Notion, or other integrations
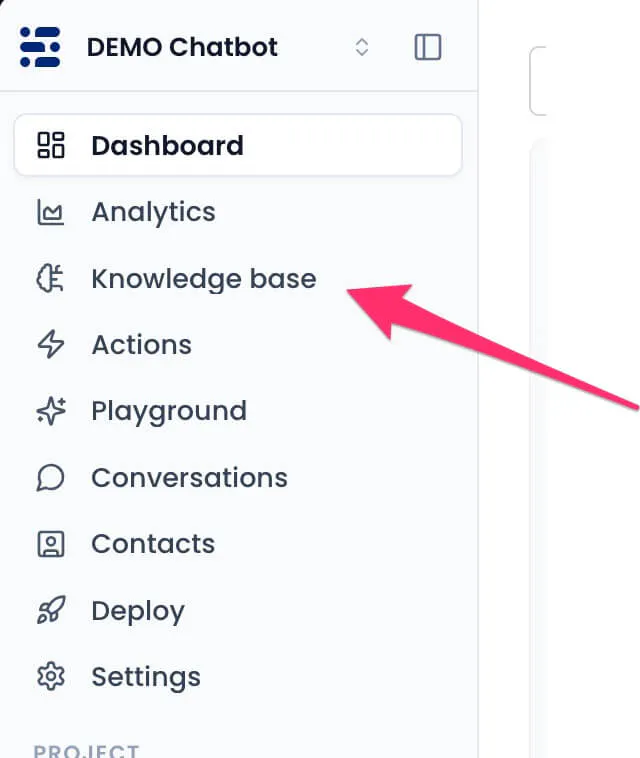
When a users asks a question, the AI searches this knowledge base and generates a grounded response, dramatically reducing hallucinations and "I don't know" replies.
Step 3: Configure AI Settings
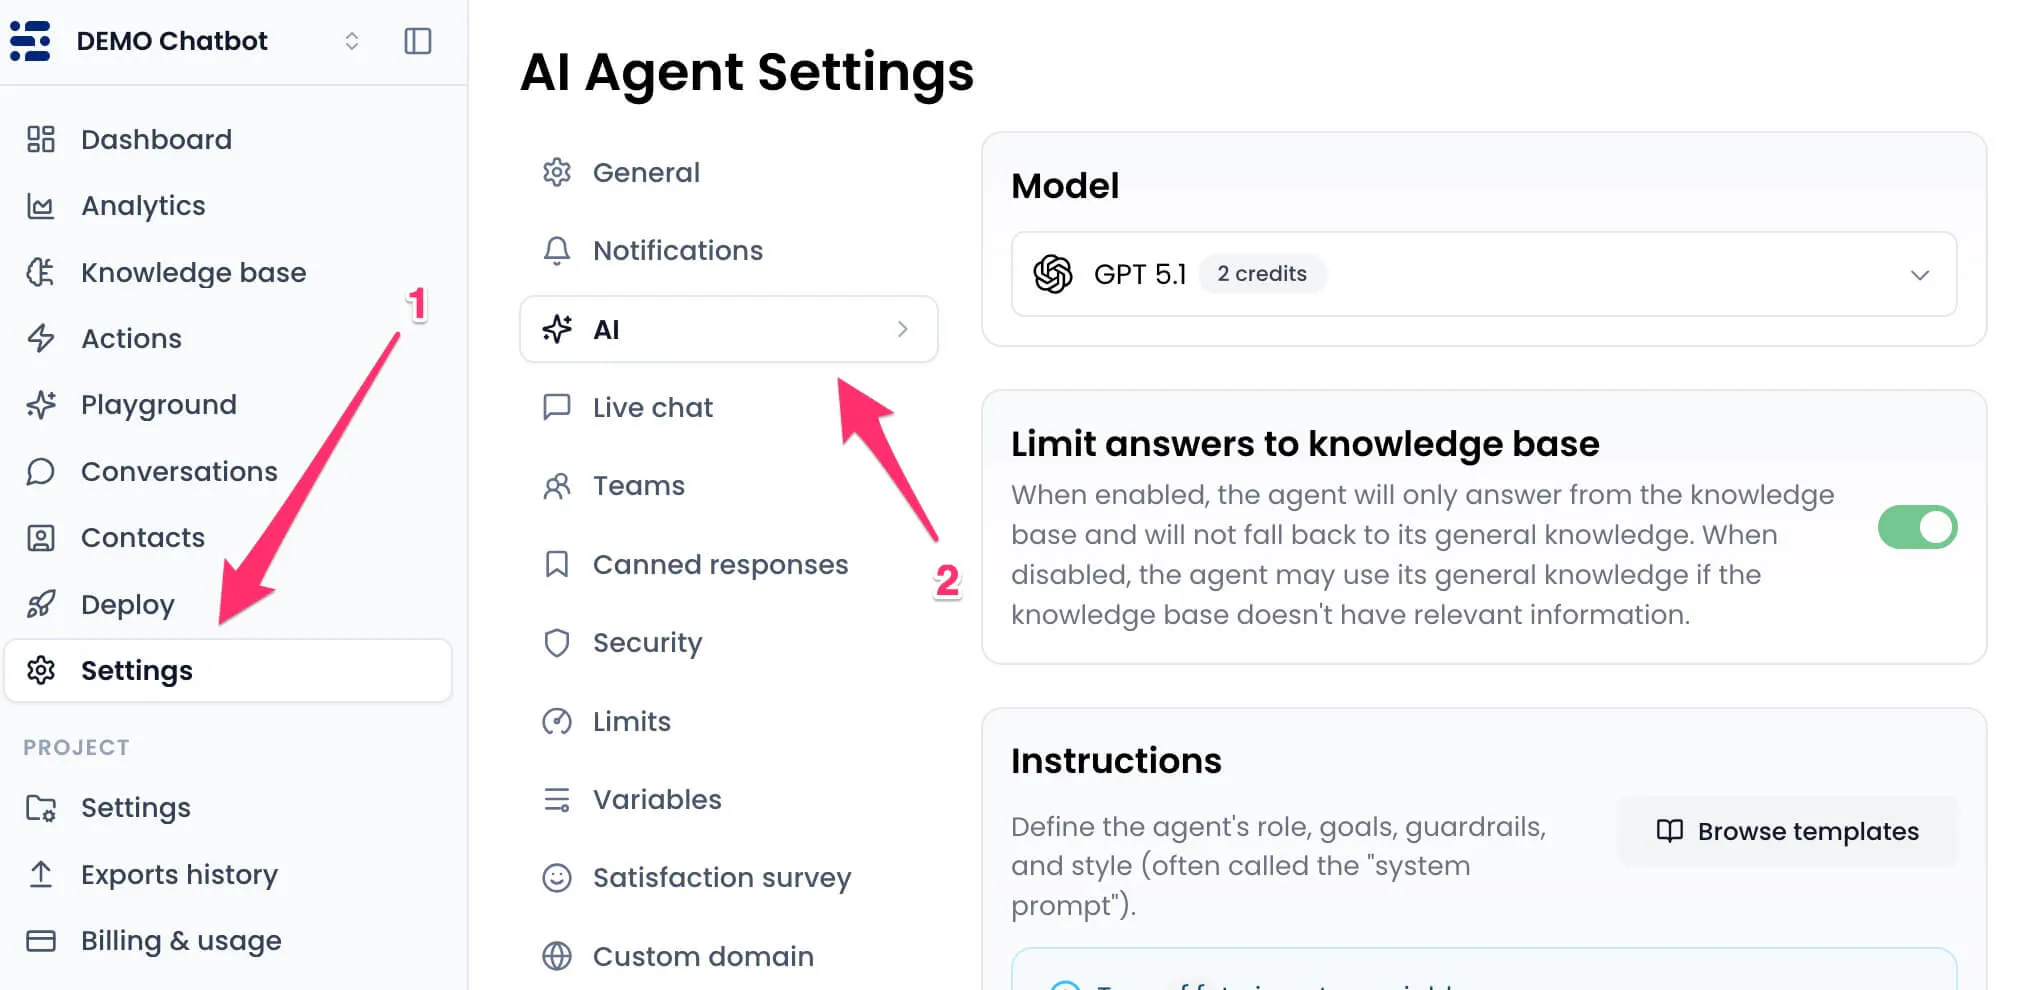
Open your chatbot's Settings → AI. This is where you shape your chatbot's personality and behavior:
- AI Model – Pick the underlying model that generates responses.
- Temperature – Control how creative vs. focused the answers are. Keep it low for factual support, raise it for a more conversational tone.
- Instructions – Your "system prompt". Define the agent's role, goals, guardrails, and tone. If you're not sure where to start, use one of the built-in templates.
Good instructions are the single biggest factor in response quality, so spend time here.
Step 4: Design and copy the widget code
Once you're happy with the chatbot's configuration, click Deploy in the sidebar, find the Website Widget option and click Manage.
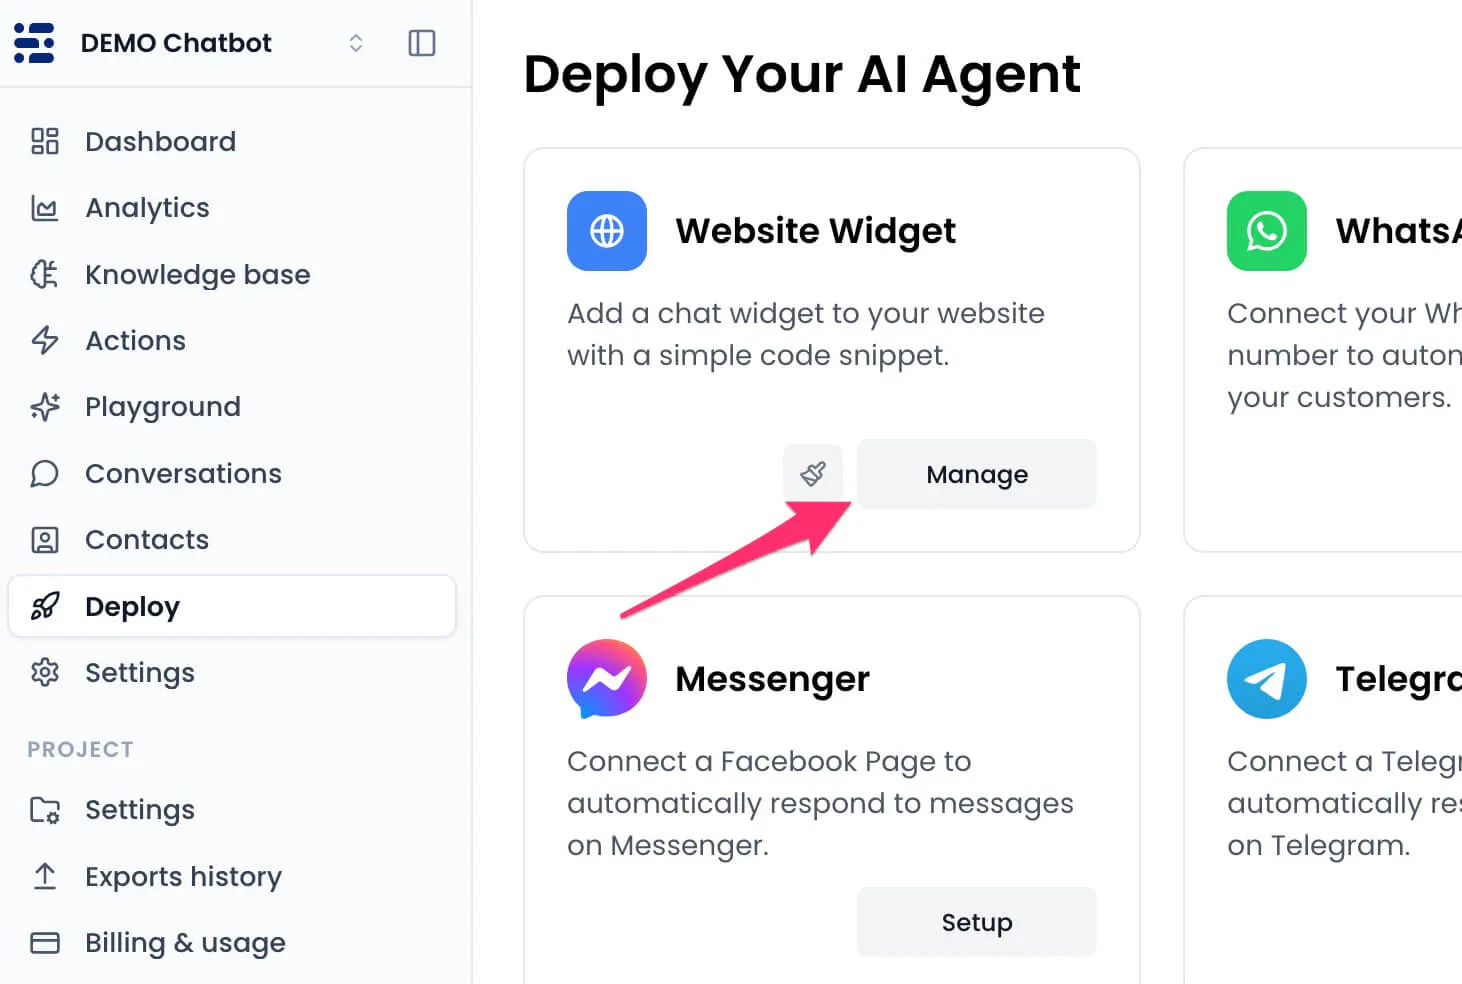
- Click Open Widget Designer to customize the look and feel.
- Choose a display mode: Floating Chat (bottom-corner bubble), Inline (embedded in a page section), or Fullscreen.
- Copy the generated widget code.
Step 5: Paste the code and publish
The final step is to add the widget code to your website and publish the change. In most cases, you’ll paste the code into the <head> or <body> section of your website’s HTML.
If you're using a website builder like Wix or Wordpress, they normally offer an option to insert code snippets into the website header.
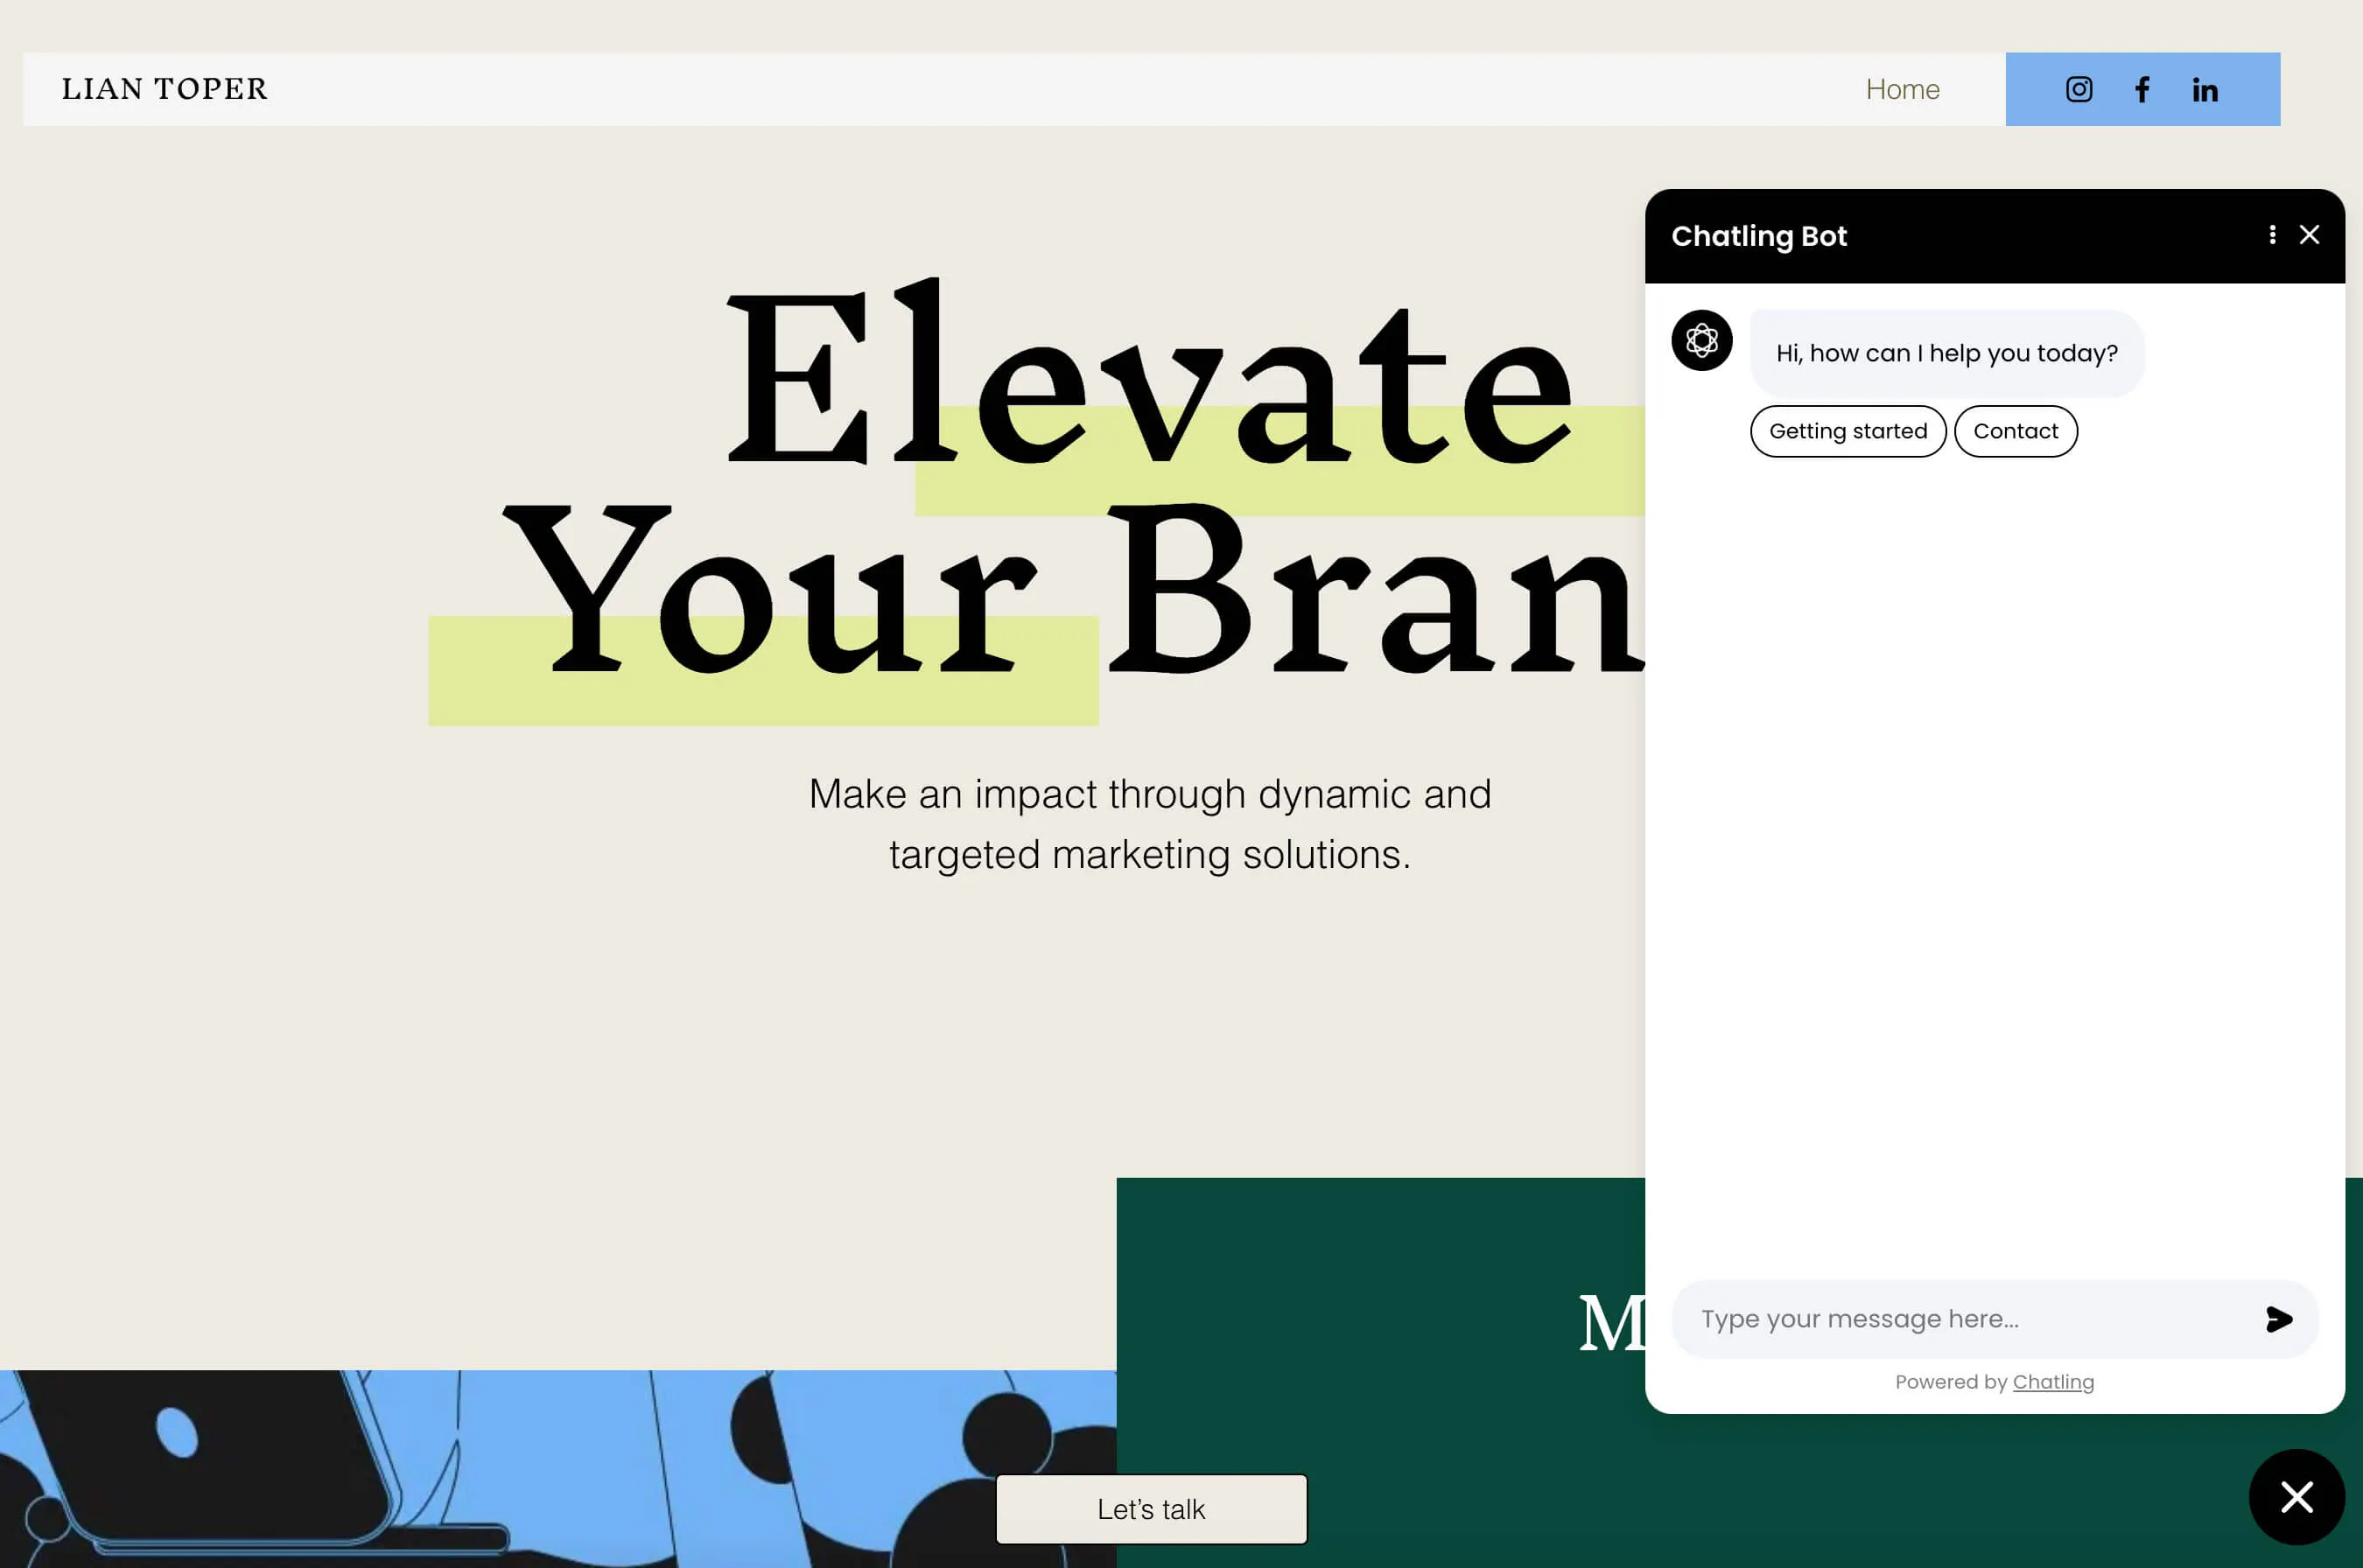
After publishing, open your site in an incognito tab to confirm the chatbot loads correctly. For Floating Chat, the widget should appear in the bottom corner. Send a test message to make sure it responds as expected.
- NOTE: The exact publishing process depends on your website platform. WordPress, Shopify, Squarespace, Wix, and custom sites all handle code slightly differently, so the next section walks through the specific steps for each.
How to integrate a chatbot into popular website platforms
Once you’ve copied your Chatling widget code, the only thing left is placing it in the right part of your website. The steps are slightly different depending on the platform you use.
Below, we’ll walk you through the exact paths for adding the widget code to WordPress, Shopify, Squarespace, and Wix so you can finish setup and publish your chatbot correctly.
How to integrate a chatbot into WordPress
You get to choose between two methods of publishing your WordPress chatbot using the widget code. You can either use a plugin or the theme file editor. The plugin route is safer for non-developers and survives theme changes.
Method 1: Use the Insert Headers and Footers plugin
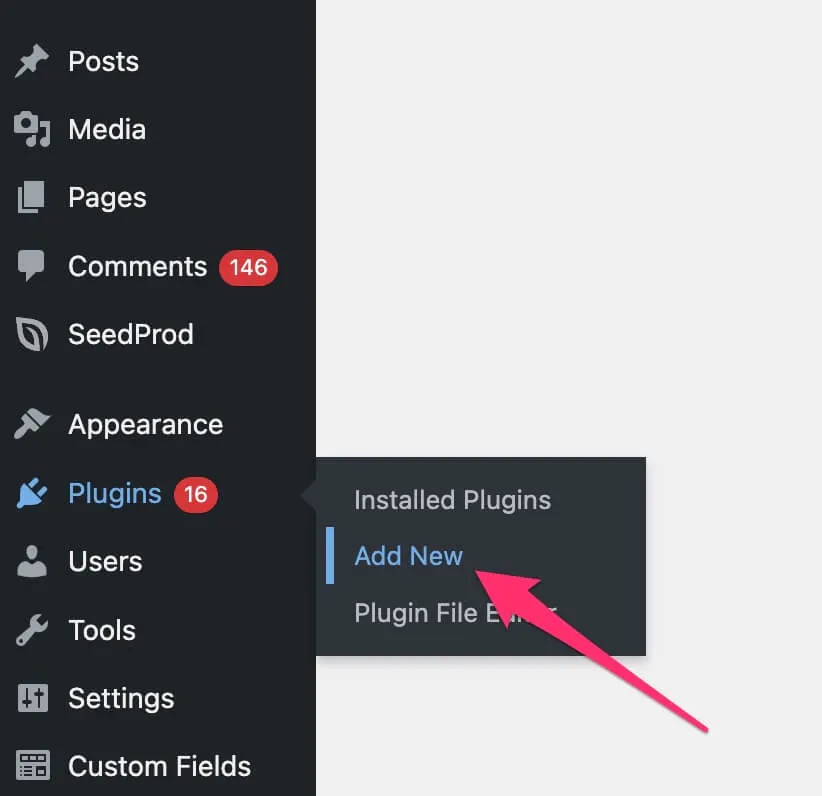
1. In your WordPress dashboard, go to Plugins > Add New.
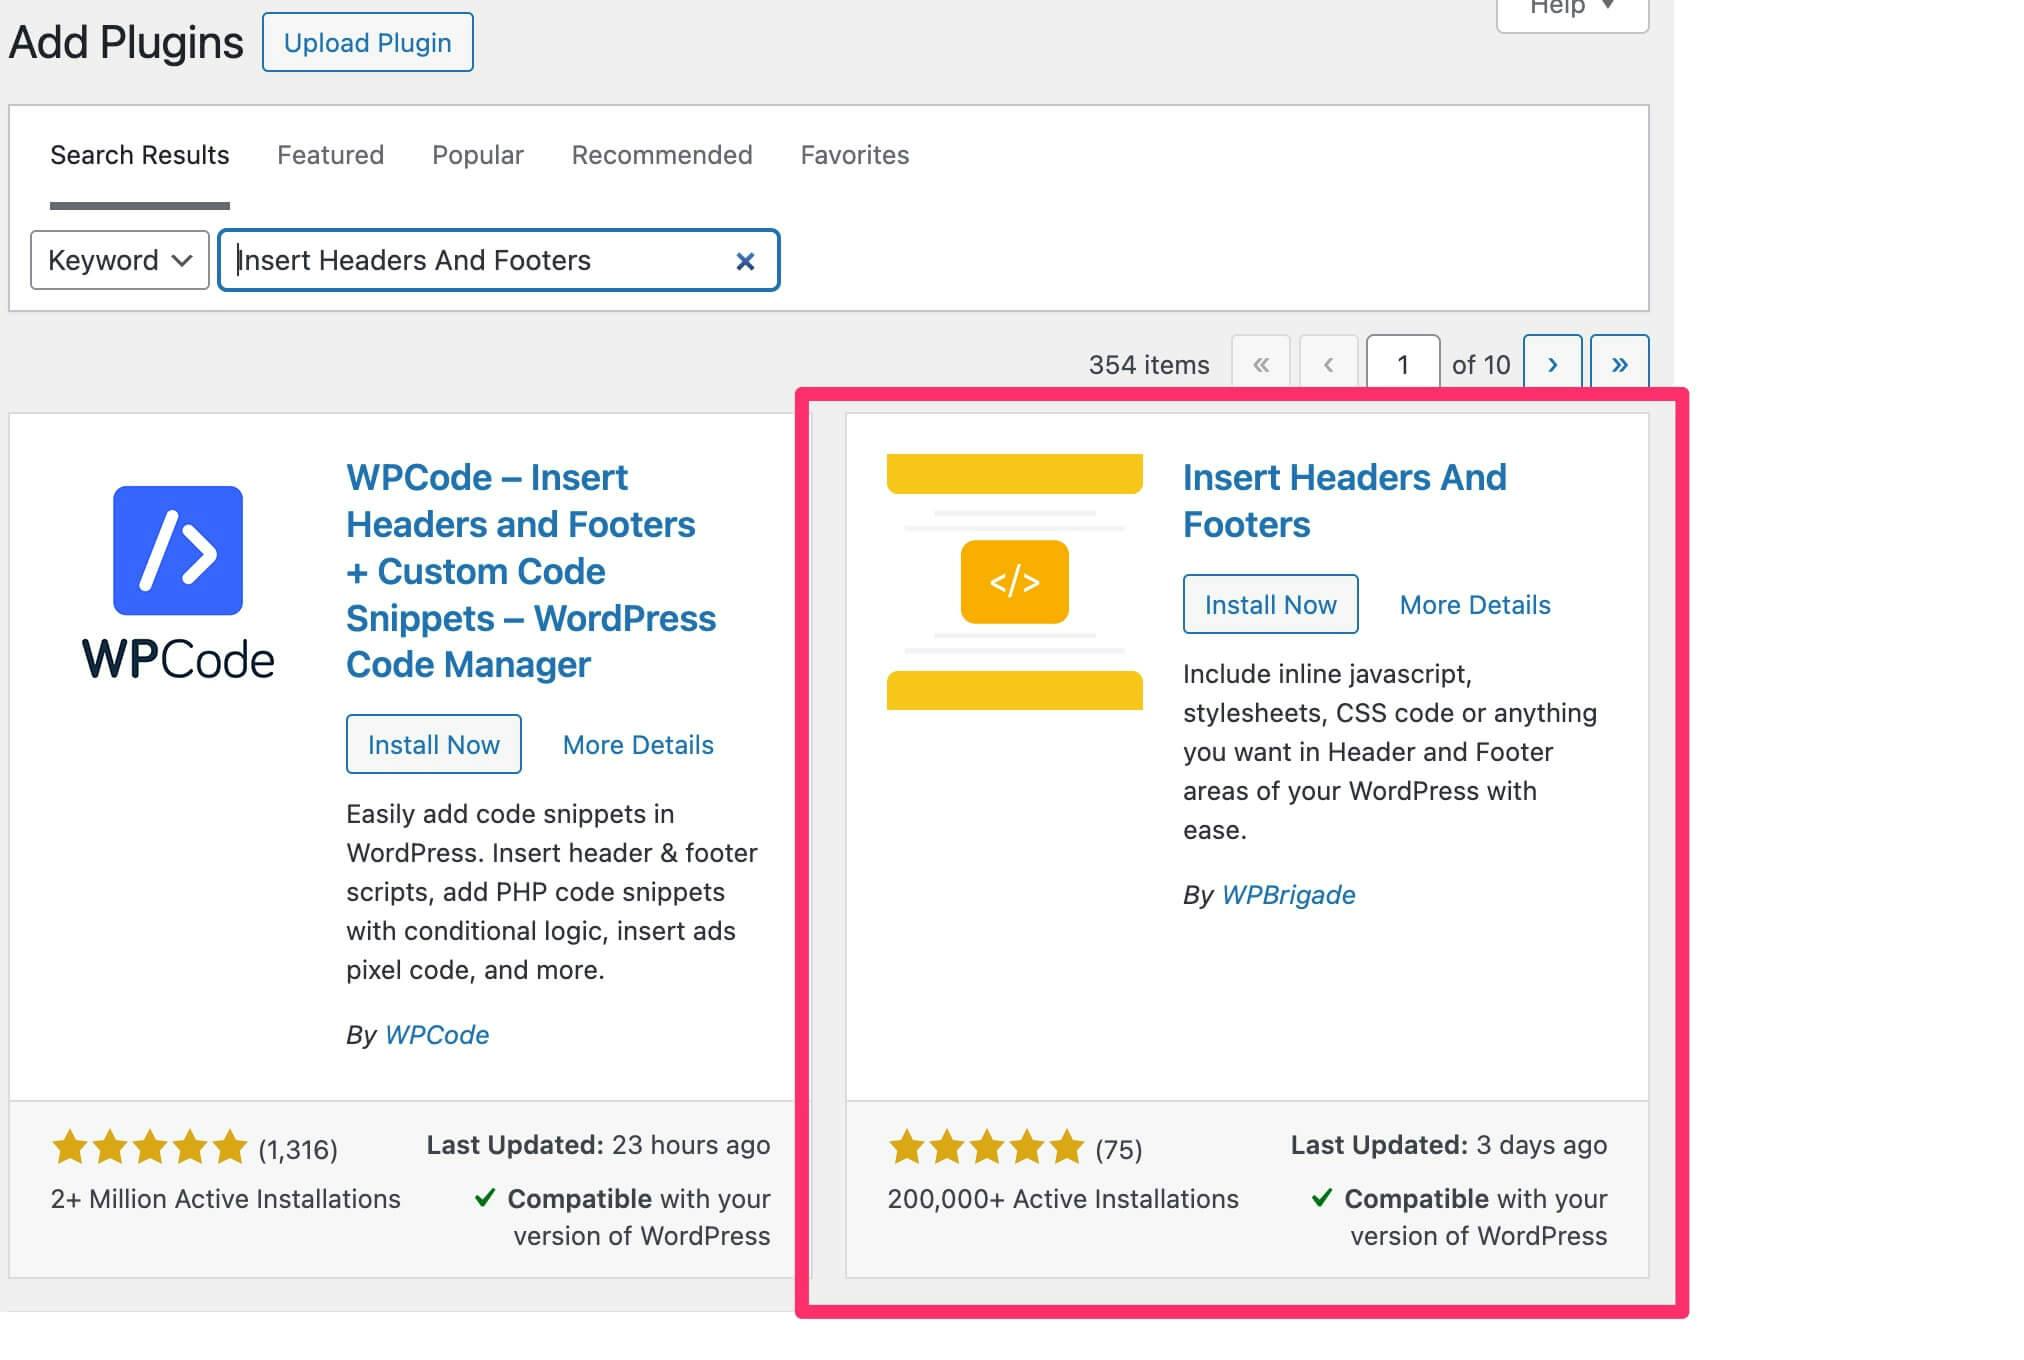
2. Search for "Insert Headers and Footers" by WPBrigade, then install and activate it.
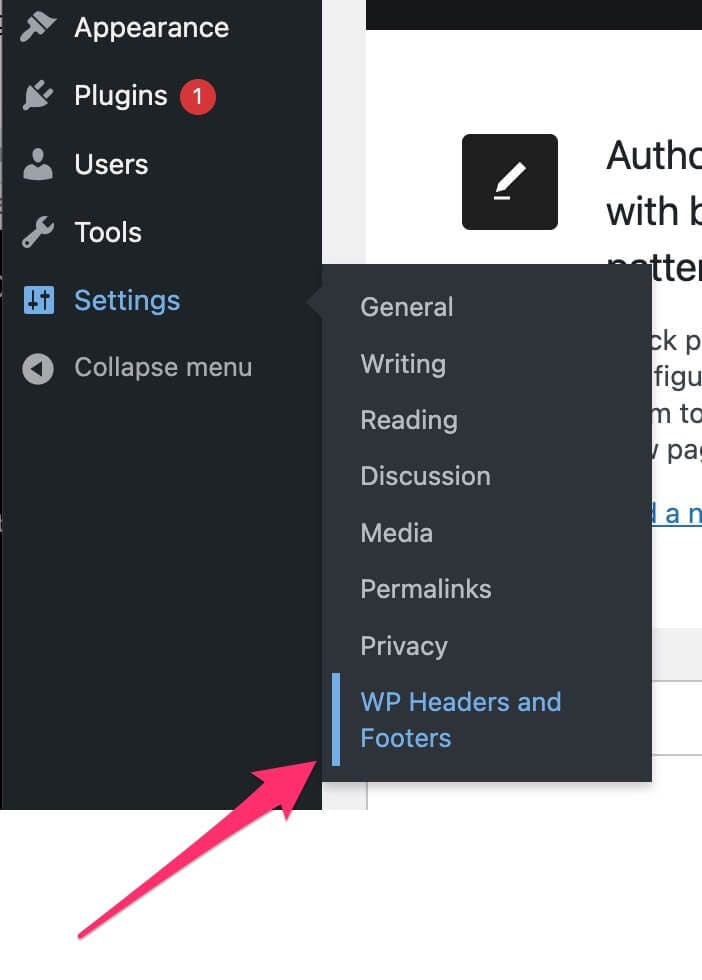
3. Go to Settings > WP Headers and Footers.
4. Paste the Chatling widget code into the header section.
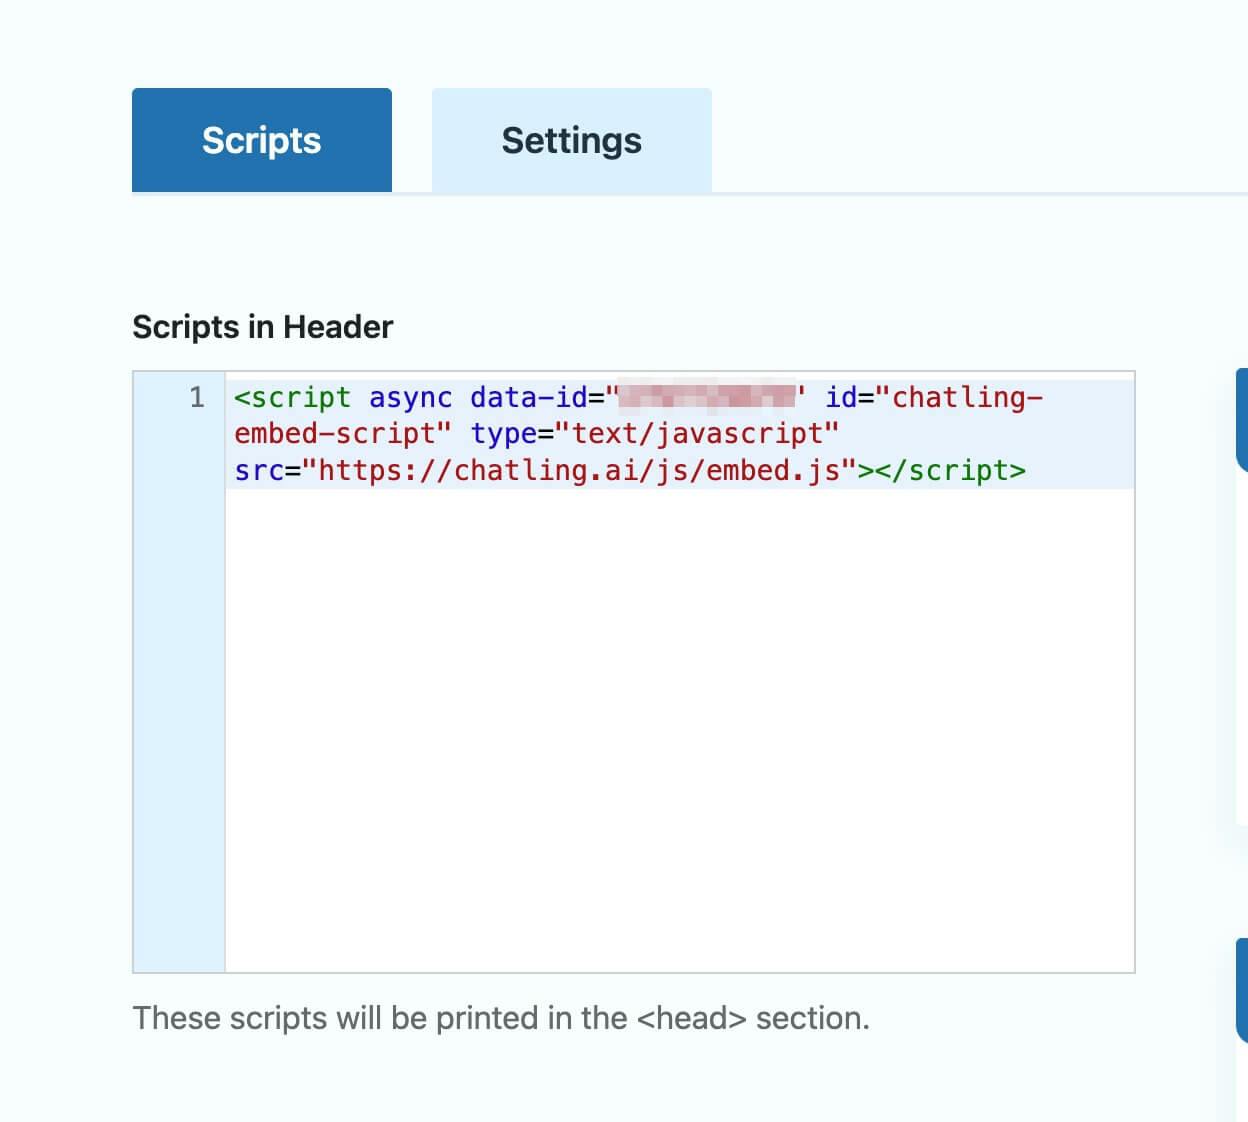
5. Click Save Changes.
The chatbot now loads on every page automatically.
How to integrate a chatbot in Shopify
Shopify gives you two methods of publishing your chatbot widget code. You can either edit the theme code directly or add a Custom Liquid section through the theme customizer.
Method 1: Edit theme.liquid
- From your Shopify admin, go to Online Store > Themes.
- Click the three-dot menu next to your current theme and choose Edit code.
- In the Layout folder, open theme.liquid.
- Paste the Chatling widget code anywhere between the opening <head> and closing </head> tags.
- Click Save.
The Shopify chatbot should now load on every page of your store.
Method 2: Use theme customization
- From your Shopify dashboard, go to Online Store > Themes.
- Click Customize next to your current theme.
- Under the Header section, click Add section and search for "Custom Liquid."
- Open the Custom Liquid editor and paste the Chatling widget code into the Liquid code field.
- Set both Top padding and Bottom padding to 0 so the section doesn't create blank space in your header.
- Click Save.
This method of Shopify chatbot integration avoids editing theme files directly and survives most theme updates.
Chatling also has a dedicated Shopify installation guide with detailed instructions. Use it if you want a visual walkthrough of where to paste the widget code in your store.
How to integrate a chatbot into Squarespace
Squarespace includes a dedicated Code Injection feature, which you can use to integrate a chatbot into your website.
Here’s how it works:
- Sign in to your Squarespace account and open the website where you want the chatbot.
- From the sidebar menu, select Website.
- Scroll to the bottom of the sidebar and choose Website Tools.
- Open Code Injection.
- Paste the Chatling widget code into the Header section.
- Click Save.
If you're on an older Squarespace v7.0 site, Code Injection is under Settings > Developer Tools > Code Injection instead. The Header field is in the same place.
The chatbot now loads on every page of your Squarespace site. Code Injection is available on Core plans and higher. Basic plans don’t support site-wide Code Injection.
For more detailed instructions, check Chatling’s Squarespace setup guide. It walks you through the Code Injection process and how to place the widget code correctly.
How to integrate a chatbot into a Wix website
Wix supports custom code through its Custom Code tool. Here’s how to add and publish a Wix chatbot using the widget code you’ve copied:
- From your Wix dashboard, click Settings in the sidebar menu.
- Scroll down to the Advanced section and click Custom Code.
- Under the Head section, click Add Code.
- Paste the Chatling widget code into the text box.
- Click Apply.
Before testing the widget, make sure your Wix site is published and has a connected domain. Then visit any page in an incognito tab to confirm the widget loads.
Chatling’s Wix installation guide shows the full process with visuals. Refer to it if you want to see exactly where to add the widget code inside Wix’s Custom Code settings.
What to do after your chatbot is live
Launching your chatbot on your website is just the start. The first two weeks after launch usually reveal the most about how visitors interact with it, where your content is missing, and how well the bot handles real questions. Here’s what to focus on during that period.
Review conversations daily for the first week
Look at what visitors actually ask, not just what you expected them to ask. Early conversations often reveal gaps in your training data, confusing product pages, unclear policies, awkward bot responses, or topics you didn’t anticipate.
Update the knowledge base
Add missing FAQs, product details, pricing explanations, troubleshooting steps, or policy clarifications based on those conversations. Chatling’s auto-sync helps keep your website pages current, but uploaded docs, FAQs, and help center content should still be reviewed and improved regularly.
Tune the handoff rules
If too many conversations escalate to humans, the chatbot may need better training or clearer source material. If too few conversations escalate, check whether the bot is answering sensitive, complex, or low-confidence questions when a human should step in.
Check analytics weekly
Track conversations, leads, peak chat times, top countries, handoffs, and satisfaction feedback where available. These patterns show which topics create the most friction and where better content or automation could reduce support volume.
Test the widget across devices
Check the chatbot on desktop, tablet, and mobile. Make sure it loads quickly, looks right, doesn’t block key buttons, and works smoothly across browsers. Mobile testing matters because many visitors will interact with the bot from their phones.
Launch your website chatbot today
Integrating a chatbot into your website is one of the fastest ways to cut response times, capture more leads, and free your support team from repetitive work. The technical part takes minutes. The value compounds over months as your knowledge base improves and your data shows you where to improve.
Chatling makes the setup as simple as it gets. Train on your existing content, copy an embed code, paste it into your site, and you're live. The free plan lets you test the whole thing before committing to anything.
Don’t have a chatbot yet? Try Chatling for free today to see how it works.
Frequently Asked Questions
Can I choose which AI model powers my website chatbot?
Yes. Chatling supports 28 popular AI models, including GPT, Claude, Gemini, Mistral, DeepSeek, and Grok. You can switch models depending on your plan to balance speed, cost, and response quality for your support workflows.
Can I use Chatling on multiple websites?
Yes. Chatling lets you create multiple AI agents and deploy them to different websites or channels from one account. Each agent uses its own knowledge base sources, settings, widget design, and deployment setup. See how many agents are included on each plan on our pricing page.
How much ongoing maintenance does the chatbot need?
Chatling auto-syncs knowledge base sources at daily, weekly, or monthly intervals to fetch the latest data. Documents, text, and FAQs stay static until your team updates them. Review conversations, correct wrong answers, and fill knowledge base gaps over time.
Is Chatling GDPR compliant?
Yes. Chatling is GDPR compliant and processes data under its DPA. Full details on data handling, retention, deletion requests, and sub-processors are on our EU Data Protection page.
Will integrating a chatbot slow down my website?
No. Chatling installs through a JavaScript widget code that runs separately from your website’s core content. Add it to your site’s header or body, publish the change, and test the live page to confirm the widget loads correctly.